Home


|
|
There a several reasons to build a PVR and whoever reaches this page sure
has his own intentions to get one as well. So i'll not explain why i built
one but how.
The reason i started building my own HTPC named Twonky was that i wanted to
have a
- silent system in a
- beautiful case that should
- be able to record and replay analog TV,
- be able to play various audio and video media formats,
- be able to play DVDs and audio CDs and i wanted to be able to
- control the whole thing via TV and a ordinary remote control.
Nice add-ons would be
- a LCD/VFD display,
- wakeup and powerdown via remote, timer and network,
- the option to play games
- ...
|
1. Hardware
The hardware selection wasn't completely unrelated to the software choice, but
most of the hardware was selected from a pure hardware point of view and
fortunately everthing worked under the operating system i finally choose.
1.1 The case
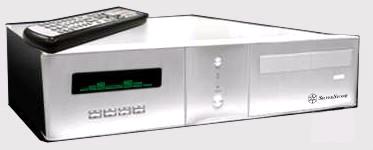
I wanted something that fitted into the living room. I personally like the Silverstone cases, especially the
flat ones. The depth of more than 40cm of these cases wasn't a problem for me,
since i wanted to place them into our tv and phono rack which has enough space
for a case with a depth of over 40cm. I finally choose the Silverstone LC11M,
a flat case with integrated VFD display and IR receiver incl. a Soundgraph remote
control. The case comes with a set of raiser cards allowing to install two
PCI and one AGP cards horizontally. A review of this case in the german computer magazine c't mentioned
cooling problems with high end CPUs, so i knew i wouldn't try to install such
a beast into Twonky. With the help of the hardware MPEG codec a low end CPU
seemed to be able everything from the wish list above. Furthermore the case
has front USB and space for a DVD drive and one (or even three) harddisks.

1.2 CPU, motherboard and RAM
The next thing i selected was the motherboard and CPU combo. I wanted
something that would draw as less power as possible but that would still
provide the power required to decode DVDs in software or run some of the
classic game emulators while capturing MPEG video in the background. I decided
that nearly any of todays CPUs would be sufficient and that i would be able to
select on power consumption only. I chose a mobile
Celeron M350 CPU, a 1.3GHz CPU that was meant to be used in notebooks. It
consumes aboout 21 watts where a Pentium 4 running at 3GHz consumes over 80
watts.

This selection limited my motherboard choice siginificantly, since the
hardware distributor of my choice only had three boards for the mobile CPU in
stock. I didn't want the newest technology and at that point was planning on
using the TV-Out of a MPEG card to connect to the TV set. So i decided to get
the AOpen i855GMEm-LFS, a micro ATX board. It provides:
- One AGP and three PCI slots. Two of these can be used in the LC11M.
- Internal audio connectors can be attached to the front audio of the LC11M.
- One internal USB2 port, can be used to drive two of the fout front
connectors of the LC11M.
- Two internal firewire ports. One of these can be used with the LC11M.
- Comes with a CPU fan that fits into the LC11M.
Since the LC11M has four front USB ports and requires another USB port for the
front display and the IR receiver i would have to connect these to three of
the four external USB connectors of the board.

I finally bought a single Kingston 512MB simm. Since the mobile CPUs don't
support dual channel operation, there's no reason to buy two smaller
simms. The 512MB is something i consider "ok". It's enough to run any standard
application and since there's no special memory requirement when time shifting
tv or so, so don't expect to need more ram.
1.3 MPEG/TV encoder and decoder
Since i already planned on using linux i went the "mainstream" way. This means
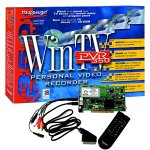
that i selected Hauppauges PVR series
as the grabber card since i new that linux drivers existed for these cards and
that they were the first choice for linux based analog TV PVRs. At that time i
still wanted to use the video output of the grabber card to connect to the TV
set, so i took the PVR-350 which comes with a TV out connector. For the same
reason i didn't select a VGA video card but wanted to use the on board VGA
during setup and no video card for the final system. Furthermore the card
comes with a IR receiver and a remote control. Since the case comes with its
own (more interesting) remote control i didn't expect to have a use for MPEG
cards IR interface.

1.4 Harddisk, DVD drive
Since i had no special requirements for these, i choose a harddisk big enough
to hold some hours of TV and a NEC 3400 DVD drive with a silver front to match
the silver of the LC11M.
1.5 Changes in hardware
Things don't always work the way ones expects them to. My original plan was to
use the TV out of the PVR card for the complete system incl. the GUI, TV
overlay, DVD output and game emulators. The video quality of the PVRs output
is great, but the video performance/compatibility when using it as a generic
video output device is rather low. This is due to two facts. On one hand the
PVR card is a simple PCI card without any 2D or 3D accelerator. Even simple
graphics cards are connected to the faster AGP and provide at least basic 2D
and 3D acceleration. On the other hand the video drivers for the TV out of the
PVR cards are still under development and are currently not as advanced as
their counterparts for current graphics cards.
I therefore added an Nvidia MX4000 based AGP graphics card to the system. The
card was cheap, came with passive cooling and had a TV out port. The
advantages are:
- Fast video for DVD and games as well as live TV.
- Adjustable overscan, so the image fits exactly onto the big screen.
- Advanced graphics drivers available from nvidia.
- BIOS/text mode support via TV out.
The disadvantages are:
- Overscan adjustment interferes with interlaced TV replay.
- Less brilliant live tv replay.
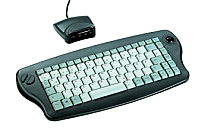
After some time of Twonky usage i realized, that some things just can't be
done with the remote control only. Therefore kesboard was needed. There are a
few remote control keyboard combos out there, but these require some special
linux drivers and will not work like a real keyboard. Thus they won't be
usable during boot time or e.g. for BIOS setup. I finally found a nice small
IR controlled keyboard trackball combo. It's not a high quality thing and the
trackball feels really cheap, but for 29 Euros it's a very handy thing for a
media PC where you don't write lengthy documents but only need a convenient
way to enter a search term or file name every now and then.

2. Assembly
Physical assembly wasn't really difficult, but all those cables needed to be
restrained. The LC11M has a bunch of cables other cases do not have. This
includes a rather huge power adaptor that fits between the motherboard and its
power supply. The purpose of this adapter is to provide access to the standby
power supply allowing the front IR receiver to work even if the computer is
switched off. With another connection between the front IR receiver and the
motherboards main switch connector, the whole computer can thus be switched on
using the remote control ... nice feature. I only had minor problems during
physical assembly. These were:
- All those cables ... i tried to hold them all in place using cable binders
but still the case ended up being quite "full of cables".
- Some of the screws holding the aluminum front plates were already worn
out. They don't just fall out of there holes, but they don't add any
stability.
- The DVD eject button of LC11M didn't reach the drives eject button, so i
glued some small plastic part to the case button. Afterwards it reached the
drives eject button.
- The DVD drive (remember that i chose a silver one?) wasn't strong enough
to push open the DVD door of the case. This is mainly due to this clever "soft
close" mechanism of that door. While this really looks nice, i makes it
difficult for the drive to open the door. I finally removed the silver front
bar attached to tray of the DVD drive and the drive now is able to push
open the door. But now i could have chosen and drive color, all silver parts
left of the drive are hidden inside the case ...
- The board has few internal USB connectors, so the front displays USB
connector is connected to the external USB port of the board. Furthermore two
of the external rear USB connectors are connected to the two other front USB
port. This required soldering a matching cable. Only one of the external USB
ports is left to be used by external hardware.
- The board sets the CPUs frontside clock to 133Mhz which results in the CPU
being clocked at 1.73GHz instead of the 1.3Ghz it is meant to be operated
at. The FSB should be adjustable from 100 to 400 Mhz, but i haven't been able
to set it to a value below 133Mhz. I tried a BIOS upgrade with no avail,
although the box the board came in mentions the M350 to be supported. But
since the CPU seems to operate stable at 1.7GHz and never gets warmer than 40
deg celsius, i decided not to care. If anyone has a hint for me: Please send
me an email.
3. Software
Twonky was always meant to run Linux. Windows Media Center Edition (MCE) was
an option, but we didn't get much further than trying to install it and having
trouble with the TV replay. Since the first trials with Linux based MythTV
went a little faster i never really tried to make Twonky a dual boot
machine.
3.1 Choosing a GUI/Distro
There are several Linux and Windows Media Center distributions. Since i was
planning to run Twonky under Linux and didn't want to recompile everything
from scratch i was searching for something as simple to install as possible. I
already had read about projects like
MythTV, Freevo and
LinVDR. Since i wanted to use analog TV, the DVB
focused VDR wasn't a choice. From the screenshots and the documentation MythTV
looked nicer and more interesting, so MythTV was my choice.
I didn't find any comfortable packages for Redhat or Suse, but at least some
debian packages. So the first tries were done with a standard debian with
seperate myth packages. This setup kind of worked, but i had several
questions. One of the people i asked about the myth/debian told me about KnoppmMyth. I downloaded
the ISO image, burned it onto CD and plenty of things ran out of the box on my
test pc (unlike suggested by the name, this is not a live cd system but will
be installed onto harddisk). The installation on the real Twonky hardware
however wasn't that trivial ...
3.2 Hardware drivers
KnoppMyth booted on Twonky as well, even the drivers and firmware for my
PVR-350 card were aready pre-installed, but after a few seconds, the first
missing driver became obvious, since the KnoppMyth didn't have a driver for
the Marvel Yukon ethernet chip. A
driver is available and works nicely under KnoppMyth. With an additional
entry alias eth0 sk98lin in the file modprobe.d/aliases the
ethernet interface was available direct after boot.
Some other drivers weren't installed by default (dvd dcryptor, lirc remote
control driver etc), but they were easily installed using apt-get.
Video io using the PVR-350 worked out of the box. I had a seperate video card
installed during installation, since the PVR-350 is no full-featured video
card and can't e.g. used for a console during the boot process. There are
frame
buffer drivers available that allow us to use the PVR-350 just like a
video card. At the time i was trying this, these drivers were in a very early
stage and didn't support e.g. the XWindow XV extension. Therefore things like
DVD playback and Xmame game emulation were running slow and choppy or weren't
running at all. So i decided to permanantly keep my GForce MX4000 graphics
card in the machine. This card isn't very fast, but it comes with all
interesting video output options (DVI, VGA and TV). Getting video out on this
card was a matter of minutes and with the
Vidias closed source
drivers ability to adjust the TV overscan getting a satisfying TV image
was quite easy. Furthermore the whole system can now be controlled using the
TV (incl. BIOS setup). The PVR-350 is now only being used for video
capturing. With the latest XV capable drivers it may very well be possible to
run Xine (DVD playback) and Xmame with the PVR-350 in a satisfying way as
well.
The only thing still missing was the VFD display. Fortunately there are third party linux drivers available.
These drivers integrate nicely into lirc and allow direct access to the VFD
display as well as the IR receiver and its remote control. With my additional
patches and my .lircrc config file its possible to use the iMon
remote control delivered with the LC11 case as a mouse replacement and to
control nearly the entire system, especially MythTV. My modified
/usr/share/mythtv/themes/blue/ui.xml will give
german users a nice colorized EPG guide.
4. Todos and unresolved issues
Some minor things are still not the way i want them to be:
- Celeron M350 is running at 133Mhz FSB and 1.73Ghz (should be
1.3Ghz@100Mhz)
- Wakeup-on-LAN doesn't work
- Powerdown via IR remotes power button emulation doesn't work


